
Dodge Grand Caravan Camper Conversion: A Solo Builder’s Guide
A dodge grand caravan camper conversion is the process of transforming a stock Dodge Grand Caravan minivan into a functional camper with a sleeping platform, storage, and a basic kitchen setup – without a professional builder, a massive budget, or prior woodworking experience. If you are trying to figure out whether this van is the right platform and what a solo DIY build actually looks like from start to finish, this is the guide.
Most conversion content falls into one of two camps: polished kit reviews that skip the real build process, or vague step lists with no actual measurements or decisions. This one is different. It is based on a real solo build I did on a 2013 Dodge Grand Caravan in my yard, working around the weather, with no prior build experience. You will find a breakdown of whether the Grand Caravan is the right platform for your situation, a clear look at your three conversion options, and a full walk-through of the DIY bed build that started it all.
If you want the full build plan with cut lists, material costs, and lessons learned, that is all in the Roaming Home guide. But this post gives you the foundation to know whether you are ready to start.
IS THE GRAND CARAVAN THE RIGHT PLATFORM?
Before you build anything, you need to know whether this van earns its place as your camper. Here is the honest breakdown.

What works in your favor:
The Grand Caravan’s interior cargo length runs close to seven feet behind the front seats, which is enough for a full solo sleeping platform without cutting your mattress. The Stow N Go seating on most 2008 and newer models folds the second row directly into the floor, giving you a flat base to work from without removing seats. The sliding doors on both sides make loading gear and cooking from the side of the van practical. From the outside it looks exactly like a family minivan, which is the best stealth you can get in a camper.
It is also one of the most common vehicles on the used market. Parts are easy to find, mechanics know them well, and a clean example in the 2011 to 2020 range can still be found at a price that leaves real budget for the build.

What to know before you buy:
Interior height is around four feet in most trims. You are not standing up in this van. If that is a dealbreaker, a full-size cargo van is a different conversation. For sleeping, cooking, and working from the back, four feet is workable.
Fuel economy is not the Grand Caravan’s strong suit. Budget for it on longer trips.
The R/T trim has a sport-tuned suspension that rides firmer than the base models. Worth knowing if you are choosing between trims.

If you are still in the outfitting and planning phase, the minivan camper outfitting guide covers how to approach the full interior layout before you cut a single piece of wood.

BUILD VS KIT VS NO-BUILD
Three Ways to Convert a Grand Caravan
Not every conversion looks the same. Before you buy lumber or a kit, know which path you are actually on.
No-build: Fold the seats down, throw in a sleeping pad or air mattress, and go. Zero cost, zero commitment, zero storage. Works for weekend trips where convenience matters more than comfort. This is where I started, and it taught me exactly what I wanted to improve.
Companies like Roadloft and Vanpackers make Grand Caravan-specific kits that install in minutes with no drilling. The Roadloft Dodge Grand Caravan conversion kit runs around $5,599 and includes a bed, modular bench, kitchen setup, retractable sink, and 395 liters of storage: use code rl-MARSHALL for $100 off.
The Vanpackers Dodge Grand Caravan conversion kit starts at $4,995 and works with 2004 to 2020 models, Stow N Go or not: use code YYJI5YUXT8CP for 5% off your first purchase. If you want to be camping within a week and have the budget, a kit removes almost all the friction.
DIY build: You design it, you cut it, you build it. More time, more decisions, more mistakes, and a setup that fits exactly how you live. This is what the rest of this post covers.
The portable power stations guide is worth reading alongside whichever path you choose, since power is the one system every conversion needs regardless of how the furniture goes in.
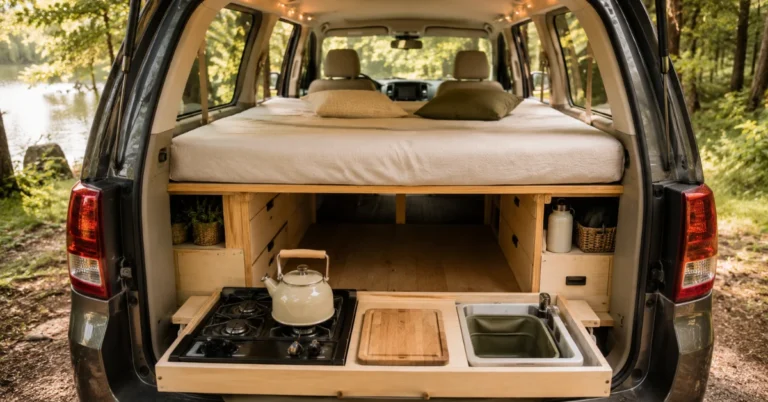
THE BUILD: CAROL THE CARAVAN
How I Built My First Dodge Grand Caravan Camper Bed
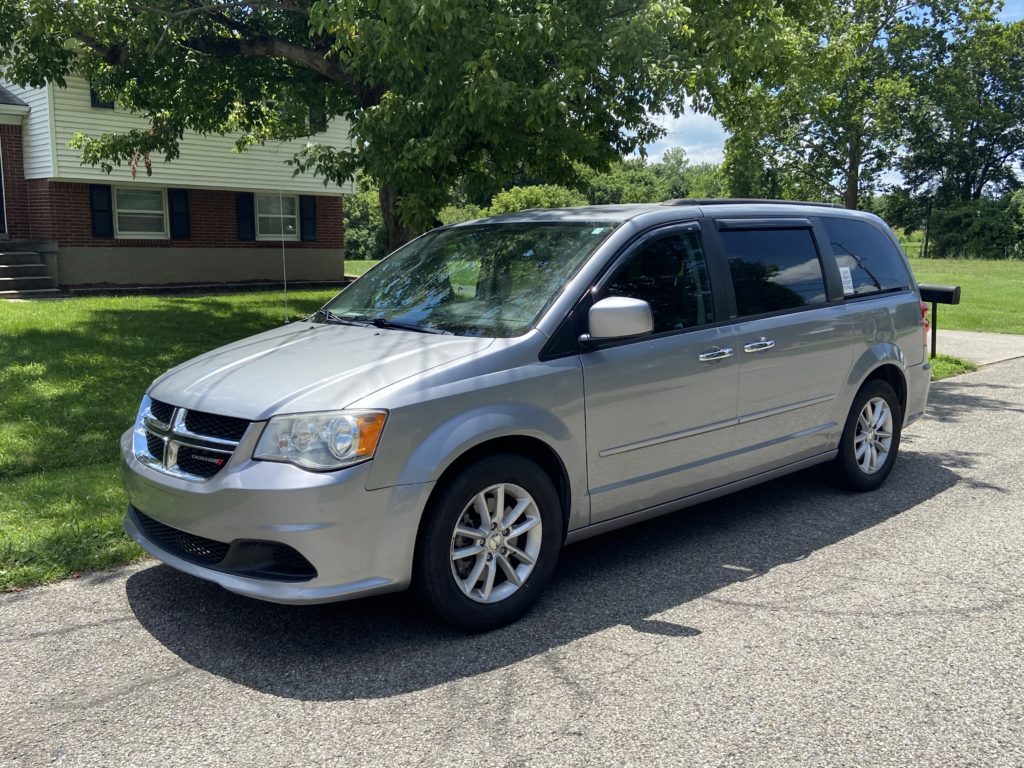
This build was on Carol, my 2013 Dodge Grand Caravan. I started with a no-build setup: a hammock, a couple of totes, and a cooler. It worked, but it was missing comfort and ease of use. One cold night at Red River Gorge in a single-person hammock with temps dropping into the upper 30s made the decision for me. I was building a platform bed.
Here is the full build sequence, including what I actually did and what I would do differently.
Step 1: Measure the cargo space
Remove everything and fold or remove all rear seats. Grab a tape measure, paper, and a pencil. Draw the basic footprint of the cargo area and record width, length, and height. Do not skip this step and do not trust dimensions you find online: measure your specific van.

Step 2: Research your mattress before you build anything
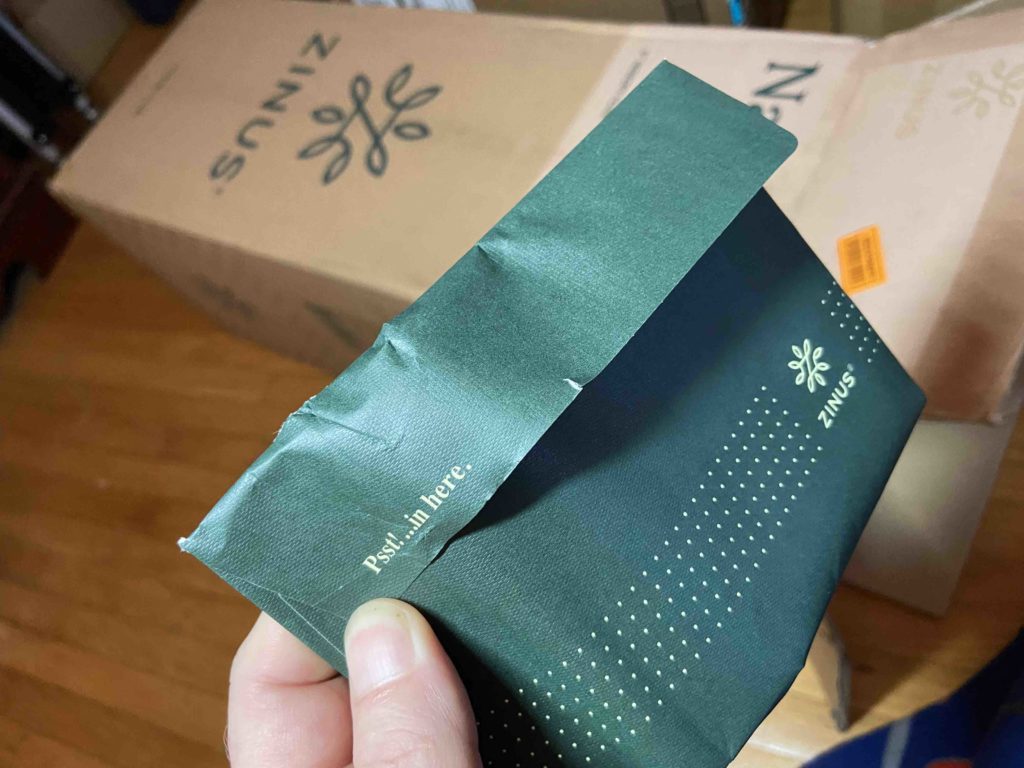
Mattress choice determines platform height, platform width, and whether you need to cut anything. I went with the Zinus 6-inch green tea memory foam mattress after finding it through Bob Wells of CheapRVLiving. Over 77,000 Amazon reviews at 4.5 stars. Affordable. Narrow twin size that fits the Grand Caravan cargo width without modification.
Order your mattress before you build the platform. It needs 72 hours to decompress and you want to confirm fit before you commit to measurements.


Step 3: Order bedding to lock in your commitment
I ordered the full bedding kit at the same time as the mattress: waterproof mattress cover, sheet set with two pillowcases, and two pillows. It sounds simple but having bedding on the way made the build feel real. Momentum matters on a solo project.
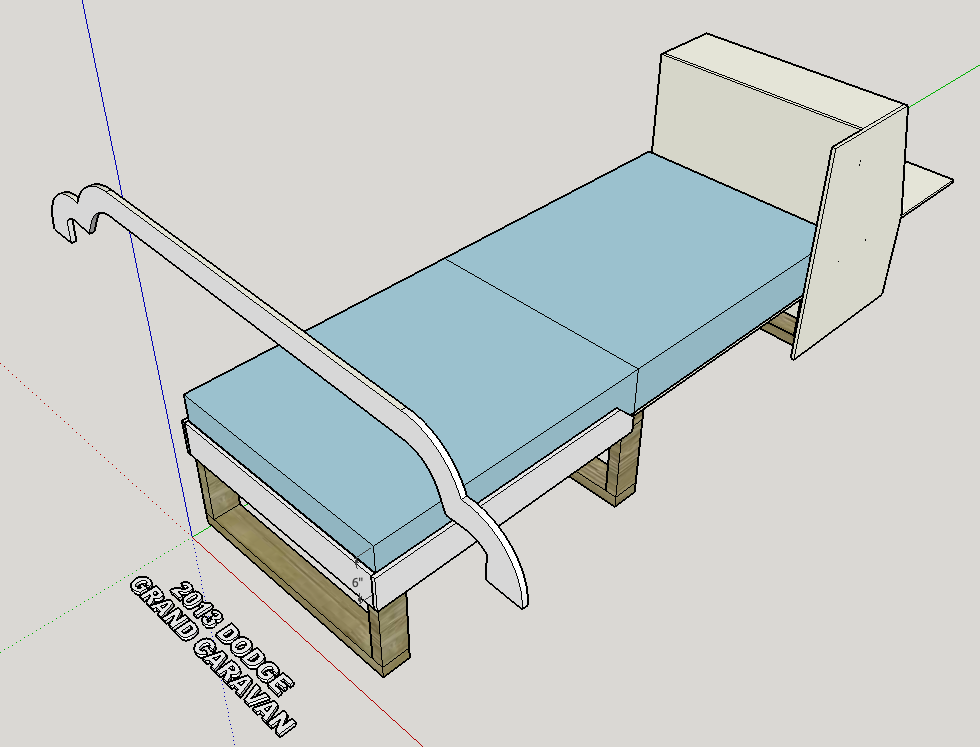
Step 4: Design your layout in SketchUp
SketchUp has a free personal use version. I used it to draw the basic design for the 2013 Grand Caravan before I touched any wood. It saved me from several bad decisions before they became expensive ones. If you are not familiar with it, the learning curve is low and there are plenty of tutorials.
Use painter’s tape on the cargo floor to map out your cabinet and platform layout before you open SketchUp. It is the fastest way to see what fits and what does not.

Step 5: Build the bed platform supports
With the design on my phone and a trip to the lumber store done, I built three rectangular supports to hold the bed platform. I used a milk crate as my height guide for the first two supports. Placed a long 2×4 across them with a level on top, confirmed it was level, then measured out 75 inches from the center console end — the length of the mattress — to get the height for the rear support.
The cordless drill and impact driver combo handled everything in this build. If you are doing a solo conversion and do not have a drill kit, this is the one tool worth buying before you start.


Step 6 and 7: Source lumber and cut plywood
I cut the plywood platform into two pieces: 30 inches wide by 37.5 inches long each. Two pieces instead of one makes it manageable for a solo builder and allows the front half to slide onto the back half when needed.
Step 8: Attach plywood to supports
Attached the plywood to the rectangular supports and added horizontal supports underneath for stability.
Step 9: Add latches to hold the two halves together
The two-piece design requires something to keep the halves connected. Simple latches on each side do the job. I learned at this stage that my mattress could not be cut in half, a custom pre-cut mattress was over $500. The latches and the two-piece platform solved that problem cleanly.

Step 10: Add trim at the foot of the bed
The trim keeps the mattress from sliding while driving and gives the platform a finished look. Same plywood, pre-drilled pilot holes, countersink bit, 1.25-inch wood screws, and wood glue. I angled the corners.


Step 11: Drill ventilation holes
Used a 1.25-inch hole saw to drill ventilation holes approximately 12 inches apart horizontally, with rows 6 inches apart. This prevents moisture from building up under the mattress. Do not skip this step.
Step 12: Apply mold-killing primer
Ventilation holes help but are not enough on their own. I gave the top of the platform and all the holes three coats of Zinsser mold-killing primer. This is the step nobody else covers and the one I am most glad I did not skip. Moisture under a mattress in a closed vehicle is a real problem. Treat the wood before the mattress goes on.
Step 13 and 14: Rough fit and final placement
Fit the platform inside the van without the mattress first to confirm clearances. Then place the mattress. Confirm sitting height, sleeping comfort, and that the platform does not shift.


Steps 15 through 20: Cabinetry, kitchen, and storage
Once the bed platform was solid, I built a lower cabinet running alongside the bed, a kitchen cabinet at the end, a small triangle cabinet at the rear, shelving above the lower cabinet, and a second shelf reused from a previous build. The kitchen cabinet was sized to eventually hold the fridge once the setup evolved.
If you are planning this stage and want to see how the full interior layout, bed, storage, kitchen, and power, fits together in a real minivan build, the MNA YouTube channel has full build footage.

SECTION 6: LESSONS LEARNED
What I Would Do Differently
These are the mistakes a plan would have prevented.
Measure twice, buy once. I made extra trips to the hardware store because I did not have a complete cut list before I started. The Roaming Home guide has the cut list. Use it.
Design the bed around the mattress, not the other way around. Order the mattress first, confirm dimensions, then build the platform to fit. I got lucky with the Zinus narrow twin. Not everyone does.
Plan for the fridge from day one. I built the kitchen cabinet without accounting for the fridge slide. It had to be modified later. If you are running a compressor fridge, know its exact dimensions before you build the cabinet around it.
Build the bed so half can stay flat while the other half converts. My design was all-bed or all-bench. I would have built it so one side could stay as a bed while the other converted to seating. That flexibility matters on longer trips.
The no-build phase is worth doing first. Sleep in the van before you build anything. You will learn more about how you actually use the space in one weekend than you will from a week of planning.
SECTION 7: FROM CAROL TO VOYAGER
What the Build Became
Carol was the first build. Voyager, a 2015 Dodge Grand Caravan R/T, is the current one. The R/T trim, mahogany-stained cabinetry, a loveseat bench that converts to a twin bed, dual Jackery power stations, and an Iceco JP40 compressor fridge. Built for two instead of solo, under $9k all-in.
The lessons from Carol are in every decision Voyager reflects. If you are planning your first Grand Caravan conversion and want the full picture, measurements, materials, power setup, and what the build actually costs, the Roaming Home ebook is the resource I built from that experience.
If you want to see how the Voyager build came together on camera, the MNA YouTube channel has the full series.
SECTION 8: FAQ
What is a Dodge Grand Caravan camper conversion?
It is the process of converting the cargo area of a Dodge Grand Caravan minivan into a functional living and sleeping space. Conversions range from a simple no-build sleeping pad setup to a full DIY build with a platform bed, cabinetry, kitchen, and power system.
How much does a Dodge Grand Caravan camper conversion cost?
A no-build setup costs almost nothing beyond a mattress or sleeping pad. A DIY platform bed build can be done for a few hundred dollars in materials. A full conversion with cabinetry, power, and a fridge runs into the thousands depending on what you include. A professional conversion kit from companies like Roadloft or Vanpackers runs around $5,000 to $6,000.
Do you need to remove the seats for a Grand Caravan conversion?
On most 2008 and newer Grand Caravans with Stow N Go seating, the second-row seats fold into the floor without removal. Third-row seats typically need to come out for a full platform build. Older models without Stow N Go require seat removal for a flat floor.
What size mattress fits a Dodge Grand Caravan?
A narrow twin mattress fits the Grand Caravan cargo area without modification. The Zinus 6-inch narrow twin is the most commonly used option and fits the cargo length of most Grand Caravan model years without cutting.
Is the Dodge Grand Caravan good for van life?
Yes for part-time and weekend van life. The interior length accommodates a full sleeping platform, the Stow N Go seating adds flexibility, and the minivan profile provides good stealth and fuel economy relative to full-size vans. It is not ideal for full-time living if you need standing room or a permanent wet bath.
Ready to Plan Your Full Build?
The bed platform is the starting point. The full conversion, cabinetry, power, kitchen, storage, and budget, takes a plan that accounts for how all of it fits together before you buy the first piece of lumber.
The Roaming Home ebook walks through the complete build process with real specs, cut lists, and the mistakes that cost extra trips to the hardware store. It is the guide I wish I had before I built Carol.
Get the Roaming Home Minivan Camper Conversion Guide
Roll on, Mellow Nomads.
Find Your People: Nomadic, Vanlife, and RV Meetups:

Planning your first trip? Check out the 2026 Nomadic Gatherings Guide for minivan
camping meetups, vanlife events, and nomadic community gatherings happening
this year.


how did you secure supports for the bed?
The supports are attached to the plywood top via wood screws. The entire unit is not attached anywhere to the van itself. It’s a pressure fit meaning the other units hold the bed in place. The kitchen cabinet unit and the passenger seat prevent the bed from going forward or backward. The raised floor prevents the bed from moving side to side. Thanks for your question. Let me know if you have any other questions!